Hello!
It’s been a long time since I last posted on my blog! I’ve gone through some very challenging years, but here I am, back and more motivated than ever to share new DIY fashion tutorials! I will try to get back into a regular posting rhythm, starting with one tutorial per month. What do you think?
I’m back with a tutorial and a pattern to sew a fanny pack!
You can’t ignore the current trend: the Fanny pack. This 90s favorite that I used to wear when I was younger is back, and I couldn’t be more pleased! Even though the internet is filled with tutorials on how to make a banana bag, I wanted to give it a try for three reasons:
- It’s still very accessible for sewing machine beginners, and it’s nice for a welcome-back, right?
- Unlike in the 90s, I won’t be buying one for this type of accessory: I prefer DIY. I have nothing against purchasing one; it’s just about showing it off proudly like a peacock and saying “I made it myself!” 😉
- You can upcycle all sorts of fabrics with this DIY: old curtains, cushions, or an old pair of jeans…
Enough talking, let’s get to work!

For this tutorial on how to sew a fanny pack for spring, I got all the necessary sewing supplies from Mondial Tissus.
- 30 cm of your chosen main fabric, here I went with sage green velvet from Mondial Tissus
- 30 cm of lining fabric, here I opted for a beautiful 70’s printed cotton fabric that complements the main fabric
- 30cm of fusible interfacing (if the main fabric isn’t stiff enough)
- 1 matching thread
- 1 zipper (30 cm)
- 110cm of of matching webbing (3 cm wide)
- 2 32mm D-rings
- 2 Snap hooks 30 mm
- Pins
- A sewing machine
- An iron
- A banana bag pattern


1. Part preparation
- Print & cut out the pattern. The 1 cm seam allowances are already included. Cut out the following 15 pieces from your fabrics:
- Cut out the following 15 pieces from your fabrics:
- Piece A (lower front): 1 time from the main fabric, 1 time from the lining, and 1 time from the fusible interfacing
- Piece B (upper front): 1 time from the main fabric, 1 time from the lining, and 1 time from the fusible interfacing
- Piece C (back): 1 time from the main fabric, 1 time from the lining, and 1 time from the fusible interfacing
- Piece D (sides): 2 times from the main fabric, 2 times from the lining, and 2 times from the fusible interfacing
2. Apply Fusible Interfacing
Fusible interface all the pieces, following the instructions on the fusible interfacing, but do not use steam when ironing.

3. Mark the Center of the Pieces
Mark the centre of each piece with a small notch to act as a guidance mark when layering multiple pattern pieces.
4. Attach the Zipper
4.1 Attach the zipper to the lower front (Piece A)
- Pin the right side of the zipper against the right side of the lower front piece (Piece A).
- Place and pin the lining right sides together, so that the zipper is sandwiched between the two layers.
- Sew all three layers as close as possible to the zipper, making a backstitch at the beginning and end of the seam. If you have a zipper foot, feel free to use it.
- Flip it to the right side, press flat, and make a decorative topstitch along the zipper edge.
4.2 Repeat for the upper front (Piece B)
- Repeat the same steps for Piece B (upper front), pinning the zipper along the curved part.
- Pin the lining right sides together, sandwiching the zipper between the two layers.
- Sew all three layers as close as possible to the zipper with backstitches at the beginning and end.
- Flip it to the right side, press flat, and make a decorative topstitch along the zipper edge.
5. Assemble the Sides (Piece D)
- For the main fabric, pin the sides of Piece D to the sides of the banana bag right sides together. Repeat the same step with the lining, so the front of the banana bag is sandwiched between the two pieces of D.
- Sew the sides at a 1 cm seam allowance, starting and finishing with backstitches.
- Trim the seam allowances. Press the seams outward with an iron, and then make a decorative topstitch along the main fabric side.
6. Attach the Straps
- Cut two 4 cm pieces of webbing. Pass each piece through a half-moon buckle and fold each end in half.
- Position the straps at the ends of the banana bag sides, with the rings facing inward. Sew a securing stitch 5 mm from the edge.
The front of the banana bag is now ready!
7. Assemble the Back
- Partially open the zipper of the banana bag.
- Pin right sides together on the back and front of the banana of the main fabric only (do not include the lining).
- Sew the back and the front at a 1 cm seam allowance, with backstitches at both ends.
- Pin the back and the front of the lining right sides together. Sew at a 1 cm seam allowance, leaving an opening at the bottom to turn the banana bag right side out.
- Before turning it, trim the corners for a neat finish.
- Turn the lining right side out through the opening you left.
- Turn the banana bag right side out through the zipper opening.
- Close the lining opening by folding the seam allowance inwards, press, and sew 5 mm from the edge with backstitches at both ends.
- Trim any excess threads.
8. Attach the Webbing
- Cut a 1m long webbing.
- Pass the webbing through the adjustment buckle and slide the buckle towards the end of the webbing. Fold 4 cm of the webbing. If your webbing is less stiff than mine, hem it.
- Make a securing stitch in a rectangle with an X inside to hold the webbing in place.
- Insert the other end of the webbing into the first snap hook and pass the webbing through the adjustment buckle.
- Pass the other end into the second snap hook and sew the hem 5 mm from the edge.
- Place the snap hooks in the loops.


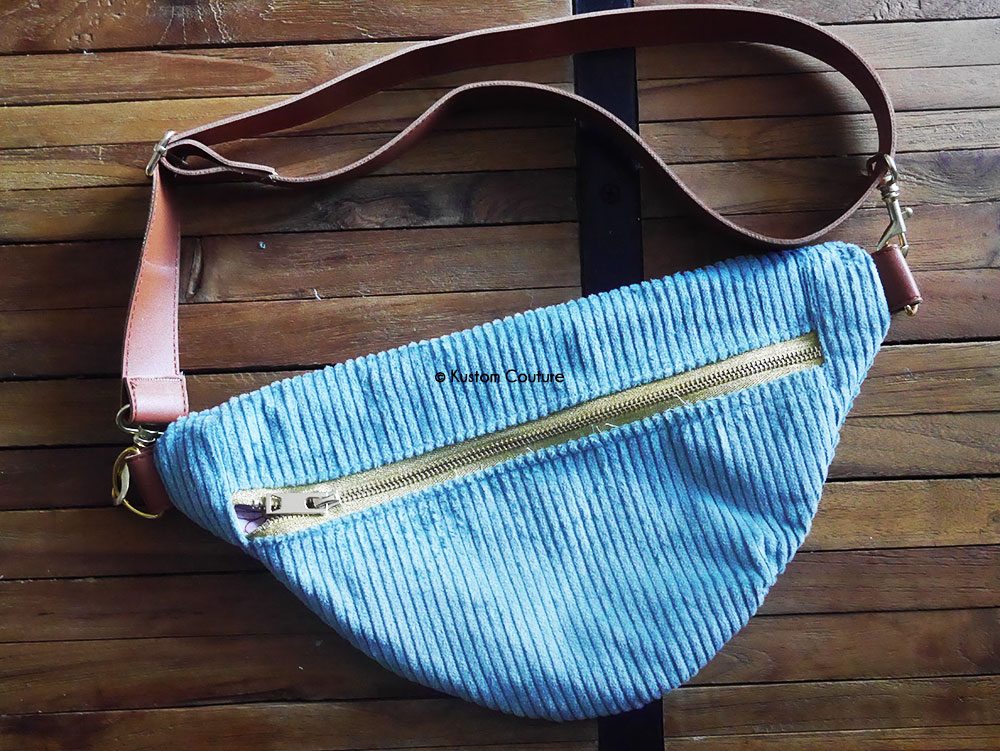
The banana bag is ready to be used! Thanks to the adjustable webbing system, you can personalize your Fanny pack and even create multiple versions to change with your mood. Get creative and add your personal touch!
What did you think of my version of the Fanny pack? Feel free to leave a little comment!
